About Me

My Photo
Monique
HI :) My names Monique and i'm a 25 (almost 26) year old australian uni student that is addicted to health, fitness, food, makeup, beauty and fashion.
View my complete profile

Outfit of the Night (Dinner date with my Boyfriend)

Good afternoon :)

Just a quick OOTN. My boyfriend and I will be heading out to dinner tonight so i wanted to wear something a little dressed up but still casual, as i'm not really sure where we are going.

( I apologise for the horrible lighting and picture quality but my proper camera battery was dead)


Dress - ASOS Cutout bodycon
Jacket - Valleygirl
Shoes - Steve Madden Wheatly in Patent Nude
Watch - Phosphor in pink
Earrings - Christmas gift from my boyfriend :) (Wallace Bishop maybe?)

Hope everyone has a nice saturday night!

Bdellium Brushes

Good morning :)

About a month ago i treated myself to some decent makeup brushes from Bdellium tools. After visiting there website i decided upon the Yellow Bambu  Foundation 5pc Brush set and a few other random brushes from their travel line.

What is the Yellow Bambu Line?
The Yellow Bambu line is a new range of brushes Bdellium is offering (the same as the green bambu but in yellow form). It consists of 'sustainable eco-friendly Bamboo handels' and 'all vegan, soft synthetic bristles with an anodised aluminium ferrule'. Most Bdellium tool bristles are treated with antibacterial agents that help prevent bacteria buildup but it is important to note that both the Green Bambu and the Yellow Bambu lines are not treated. All if these brushes are crazzzzyy soft and they feel amazing on my face.

What brushes did i get?
Yellow Bambu Foundation 5pc Brush set includes...
- 957Y Precision Kabuki
- 955Y Finishing
- 953Y Duet Fibre Foundation
- 948Y Foundation

Travel Brushes...
- 776T Blending
- 708T Bent Eyeliner
- 731T Mascara Fan Brush
- 934T Precision Concealer

957Y Precision Kabuki


I use this brush with my liquid foundations and find it gives me a nice, even and flawless application. I prefer this brush compared to the Duet Fibre foundation or the regular foundation as i find it easier to work with because of its short, dense bristles.

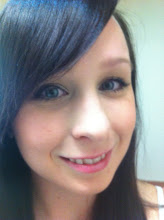
(^ Bare skin before using Precision Kabuki and Foundation) 

(^ After using Precision Kabuki and Foundation)

953Y Duet Fibre Foundation


This is basically a mini, denser version of the Finishing brush (So Cute!). I prefer to use this for blending out my concealer and adding extra coverage to small areas of my face if needed after foundation application, this seems a little too small for all over foundation application.

955Y Finishing


I use this particular brush for applying my blush (works really well!). I find that it gives me nice, light coverage which allows me to build up as much or as little blush as i want. It also works well with foundation but i prefer my Precision Kabuki instead.

(^ Duet Fibre Foundation Brush gives nice, even and buildable coverage when used with blush)

948Y Foundation


Unfortunately i haven't tried this brush yet :( i have never been a fan of the standard foundation brush... i find no matter which one i use i always end up with streaky foundation and then find myself using my hands. Maybe i'm using them wrong?

776T Blending


This blending brush is exactly what i was looking for! i have other blending brushes but none in this shape or fluffiness. These bristles are made of natural fibres so not as soft as the synthetic but still pretty soft. There isn't roughness of any kind when using this. Really nice brush!

708T Bent Eyeliner 


I thought it would be nice to give this brush a try because i had heard how easy gel eyeliner was to apply with bent eyeliner brushes. I'm used to the angled brushes which don't offer much precision when it comes to fine lines and getting a nice pointy end on the winged eyeliner look. When i fist used this i found it really hard to control, i think partially due to the fact that the bristles are quite alot longer than i expected and partially because i had never used it before. I think like anything 'Practice makes perfect'.

(^ Used Bent Liner with Bobby Brown Longlasting Cream)

731T Mascara Fan Brush


I was really disappointed after buying this because i found out this was ment to be used with cake mascara opposed to the normal wand mascara :( i still tried it with my wand mascara and couldn't really get it to apply properly. Although the process of applying the mascara to lashes with this brush is really tedious i found that it gave a really light, clump free application that would be alright for everyday wear (if you were willing to spend that much time of your lashes).

 (^ Before using mascara fan brush)
(^ After using Mascara Fan Brush... Slightly more defined)

936T Concealer


This is a really soft synthetic fibre brush with a rounded somewhat pointy tip that i find this really good for applying concealer into the very inner corners of my eyes and sometimes good for dotting concealer onto my blemishes. Overall a nice brush that works well and doesn't leave streaky marks.

I bought all of these brushes from the Bdellium Tools website -> Here <- which is based in America or you can look at their blog -> Here <- to find out others stores. The brushes were pretty decently priced ($75.00 for all 8 brushes) considering they are such good quality although the shipping was pretty ridiculous! It cost me $53.95 to ship 8 brushes to australia, which was almost what i paid for the brushes :o Strange thing was that i received my order is two parcels, the individual brushes came through regular mail and the set came through registered post. I wouldn't have thought that it would cost $54 to ship such small items :s

Anyway, i'm completely happy with the brushes.
If anyone knows where i can get them in australia please comment below... i would be interested in buying some more but just don't want to pay all that postage again :)
If you want to see my FOTD created by using only these brushes, click -> Here (Coming soon) <-

Nail of the day - DIY Caviar Nails

Hi again,

So i first came across Caviar nails when reading MissTango2's Blog ->Here<-...
Although i only just painted my nails 2 days ago i fell in love with this nail art instantly i just had to have them. I rushed down to my closest Spotlight store in search of Microbeads, which they ended up only having 5 colours (Gold, Silver, red, blue and black... Disappointing :(   ). I decided on the brightest colour of them all, blue, and then decided to pick up silver (just because i like silver).

The microbead packets where pretty ridiculously priced at $7.99 each, considering i was watching youtube videos where people in america bought packs of 6 colours for $7.00 :O craziness!

What you need:
- (Optional) Base coat
- Nail Polish (i used revlon in 791 Midnight affair
- Microbeads (Any colour you want, i used blue)
- Container to pore microbeads into
- (Optional) Topcoat


What to do:
1- Apply Base coat to all nails and let dry
2- Apply a thick layer of your selected nail polish to only one nail, depending on what nail polish you chose you may want to apply one or two coats. I chose a really opaque dark blue so i only required 1 coat.
3- Straight after applying nail polish sprinkle the microbeads onto your nails, letting the container catch any excess that fall. I just kept poring till i thought my entire nail was covered. Its really easy to just pore the excess beads back into the shaker bottle before starting your next nail.
4- Once your happy with the coverage, gently push the beads away from the edges of your nails so that it looks neat. Then gently press on the top of your nail to slightly flatten the microbeads (this way they aren't all gross and bumpy... it also allows them to adhere to the nail polish better).
5- Continue on carefully to the next nail and repeat steps 2 to 4, make sure not to bump the last nail done. (If you find it easier to watch someone do it first there are plenty of videos on youtube, just search 'Caviar Nails')
6- I left my nails let for a good 15 mins before applying topcoat.

NOTE: I didn't realise this before... but the topcoat actually changed the colour and appearance of the microbeads. Seemed like it dragged some of the colour off maybe?
Also beware that the tips of the nails with microbeads on takes ridiculously long to dry with the after applying topcoat. I had to pretty much sit still and not do anything for an hour till my nails where completely dry.

(This was after applying topcoat)


(This was before applying topcoat)


Such a flook but i actually don't mind my nails with the topcoat. I like the the nice purple colour they became after but i also like the nice royal blue they were beforehand. At lease with the topcoat they might last longer *Fingers Crossed*

All in all it's time consuming and not very practical, i've already had my nails snag on my hair and had a few beads pop off but i don't really mind because you can't tell when looking at my nails. I'm still interested in trying different colours so anyone knows where i can get nicer microbeads in australia and for cheaper comment below and let me know, i would love to get a few bright colours together and maybe try a rainbow caviar nail :D

Have a nice rest of your day!

Outfit of the Night (Dinner with family)

Good afternoon people,

So today i've prepared an amazing Mother's day dinner to share with family tonight and I thought what better a time than now to post my first OOTN.


Dress:                  Sportsgirl - Long Sleeve Black Bodycon
Dress Jacket:       The Iconic - Billie Trench
Shoes:                 Supersoft by Diana Ferrari - Hanna
Bracelet:              Pandora - Silver Clasp Bracelet and Various Charms
Watch:                 Citizen Eco-drive - EW9780-57E
Necklace:            Wallace Bishop - Custom made name Bracelet


Talk soon :)

Dr.Lewinn's Ultra R4 Recovery Masque

Hi :)

I thought i would do this review because i couldn't find any on the internet and thought everyone should know about how great this mask actually is. I have been using the Dr.Lewinn's Ultra R4 Recovery Mask on and off for about a year now and still love it. This is my go to mask all year round (especially in summer) as it helps to unclog my pores, smooth skin, reduce any breakouts and stop oiliness in its track.


I originally bought a small 30g tube of this mask at work for $1.50 (BARGAIN!) and after using it for the first time i went back and bought 4 extra tubes... I found that it made my skin amazingly soft and rejuvenated after washing it off, as well as unclogging my pores and soothing any breakouts i had at the time.

Dr.Lewinn's claim this mask has ingredients that will 'promote youthful looking skin' by rejuvenating, refining, repairing and giving radiance. It will also draw out 'pore-clogging impurities' as well as after time  'help smooth out fine lines and wrinkles, enhance firmness and restore skin radiance'. It should be used 1-2 a week by smoothing a thin layer all over the face and leaving for 10-20 mins, then washing off with a warm washcloth.

After reading up on the Dr.Lewinn's website about the ingrediants, i was quite impressed.

Key Ingredients
Benefits
Palmitoyl Tripeptide-3
Stimulation of Collagen synthesis
Palmitoyl Oligopeptide“ Ceramide-2 Complex
Stimulation of Collagen & Elastin synthesis
Bambusa Vulgaris (Bamboo) Extract, Pisum
Sativum (Pea) Extract, Glucosamine
Resurfacing & Anti-Wrinkle
Tricholoma Matsutake Singer (Mushroom)
Extract
Brightens & Lightens
Punica Granatum (Pomegranate) Extract
Anti-Oxidant, Moisturising & Protecting
Crithmum Maritimum (Sea Fennel) Extract
Calming & Relaxing
Minerals - Copper, Zinc, Magnesium
Energising, Stimulating & Regenerating
Sodium Ascorbyl Phosphate (Vitamin C)
Lightening, Anti-Oxidant & Collagen synthesis
(Sourced from: http://www.drlewinns.com.au/index.php?id=34)

Unfortunately i can't say for sure whether or not this mask helps reduce fine lines and wrinkles as i don't use it regularly enough to reap the benefits but i can back up the claims that it does calm, refine, radiate and unclog pores... which is the main reason i use it anyway.

The texture of this mask is really creamy and you can smooth a little a long way, which means getting more uses out of the tube... with a price tag of $60 for 100g tube i know i would like to get as many uses as possible!


The smell took me a few goes to get used to. I'm horrible at picking smells but if i were to take a guess i would say it smells of a mix between lemon and something minty... which would explain why it has a great tingly sensation when put on the face.

Overall, i love this product and will continue to use it. I love that it instantly softens and refines my skin as well as instantly unclogging my pores. If your keen to give this a go i know what sometimes Dr.Lewinn at myer has a gwp or chemists sometimes have them on special. I will be thoroughly sad when my last 30g tube runs out :(

If anyone can suggest a mask that might be better than this one please let me know in the comments below :) Have a nice day!

 
Miss Monique D. © 2012 | Designed by Rumah Dijual, in collaboration with Buy Dofollow Links! =) , Lastminutes and Ambien Side Effects